Getting Started
This tutorial is adapted from Getting Started by Casey Reas and Ben Fry, adapted from the book, Getting Started with Processing, Maker Media 2015. CC BY-NC-SA. Adapted to L5 by Lee Tusman.
Getting started
Welcome to L5!
Getting set up to create programs in L5 consists of these parts:
Installation
- Installing the LÖVE (also knows as Love2d) application for your system, available for Mac, Windows, and Linux.
- Downloading the L5 Starter Project.
- Setting up a code editor to write your code in.
LÖVE/Love2d is the framework powering our creative coding library. L5 is the language library we'll be using to write our code, meaning it is full of resources we can use to write our own programs. These includes functions such as drawing, displaying images, and tracking the mouse movement and clicks.
The first step is to install LÖVE/Love2d. This will differ slightly depending on what your operating system is. So follow the install instructions there.
After installing Love2d is complete, download the L5 Starter Project. It is a zipped folder containing the L5.lua library file, a basic main.lua starter program, and a README.txt with some information about L5. You'll need to uncompress the folder. On a Mac, double click the .zip folder. On a Windows machine, right click and choose "Extract All...". On Linux, you can use various programs such as zip or usually you can right click and choose "Extract".
We're almost ready to get started learning about and writing code. But first we need a code editor.
Editing Code
As its name implies, a code editor is a place to write your code. Some editors are minimal, mostly just a place to write and edit. Others have lots of features like autocomplete, nice colors, or other tools to make writing code more comfortable. There are many code editors that are free and open source, that you can use freely, and are built collectively, and for a commons.
You shouldn't use a word processor like Word or LibreOffice, as they aren't meant for writing code. While you could use the built-in Textpad on MacOS or Notepad on Windows, neither of these are much fun to write code in.
Many people like code editors like Sublime Text, VSCodium, or Geany. But there are dozens of others available. If you've previously coded with Processing, you may have tried the Processing IDE. One particularly friendly editor for beginners to L5 is Zerobrane Studio, a lightweight editor with auto-completion, syntax highlighting and debugging features built-in for our underlying Lua/Love2d code. If you use another editor you may have to look for information on setting it up for working with Love2d for example for Geany, VSCodium or SublimeText.
Main workflow
A typical workflow is to write code in your main.lua, making sure that require("L5") is the top line in your program. Once you add or edit code, to run your program you'll first save. Then on the desktop, drag the folder holding your project files onto the icon for LÖVE/Love2d.

A typical code editor window. This is Geany.
Your First Program
You're now hopefully running a code editor. While the details will differ depending on whichever one you chose to use, the main thing is that there should be a large code editing window for you to write your code in.
Some code editors are full-featured Integrated Development Environments (IDE). The Processing IDE for example has a space for editing code, a play and stop button, and a console for output messages and errors.
In whichever code editor you are using, inside your new main.lua file type the following underneath the previous line require("L5"):
require("L5")

function setup()
  ellipse(50, 50, 80, 80)
end
The function setup() section tells our program to start here first and run the enclosed code once. It's important that you include the parenthesis immediately after the word setup! After this line we'll put our code for drawing on screen. Then we'll end the setup section with the word end on the last line.
ellipse(50, 50, 80, 80)
This line of code means "draw an ellipse, with the center 50 pixels over from the left and 50 pixels down from the top, with a width and height of 80 pixels." Incidentally, the space before the word ellipse is optional, and will have no impact on your program, but it's a custom that programmers use to make their code inside the setup function (for example) easier to read. It's also common to skip lines before and after functions, which again has no impact on how your program's output when it runs.
After entering all this code save your main.lua. Then drop the folder holding your project's main.lua and L5.lua files onto the Love2d applicaton icon.
If you've typed everything correctly, you'll see a circle on your screen. If you only see a black screen, you forgot to include the line require("L5") at the top of your main.lua file. If you didn't type something correctly, the window will turn blue and in white text complain about an error. If this happens, make sure that you've copied the example code exactly: the ellipse's numbers should be contained within parentheses and have commas between each of them. Check your spelling of function, setup(), ellipse and end!
One of the most difficult things about getting started with programming is that you have to be very specific about the syntax. Our coding software isn't always smart enough to know what you mean, and can be quite fussy about the placement of punctuation. You'll get used to it with a little practice.
Next, we'll skip ahead to a sketch that's a little more exciting. Delete the text from the last example, and try this:
require("L5")

function setup()
  size(480, 120)
end

function draw()
  if mouseIsPressed then
    fill('black')
  else
    fill('white')
  end
  ellipse(mouseX, mouseY, 80, 80)
end
This program creates a window that is 480 pixels wide and 120 pixels high, and then starts drawing white circles at the position of the mouse. When a mouse button is pressed, the circle color changes to black. We'll explain more about the elements of this program in detail later. For now, run the code, move the mouse, and click to see what it does. When you are finished, quit or close your program window.
It’s always a good idea to save your code sketches often. As you try different things, keep saving with different names, so that you can always go back to an earlier version. This is especially helpful if—no, when—something breaks.
To create a new sketch, you'll create a new independent project folder, with its own L5.lua and main.lua inside.
Examples and Reference
Learning how to program involves exploring lots of code: running, altering, breaking, and enhancing it until you have reshaped it into something new. With this in mind, the L5 website includes examples that demonstrate different features of the software.
To use example code, you can copy the code and paste it into your code editor window in your main.lua file. As always, make sure you have require("L5") at the top of your file. That tells the computer what to do with your code when you try to run it.
When looking at code in a text editor with syntax highlighting, you'll see that functions like ellipse and fill() have a different color from the rest of the text. If you see a function that you’re unfamiliar with, visit its page on the online reference index page or type it into the search in the top right of the website. You can also press / from any page on the site and it will automatically open up the search feature where you can type the word you're looking for.
The L5 Reference explains every code element with a description and examples. The Reference programs are much shorter (usually four or five lines) and easier to follow than the longer code found in the Examples section. We recommend keeping the Reference handy while you’re programming.
Here's an example page from the reference about presenting your work in fullscreen mode.
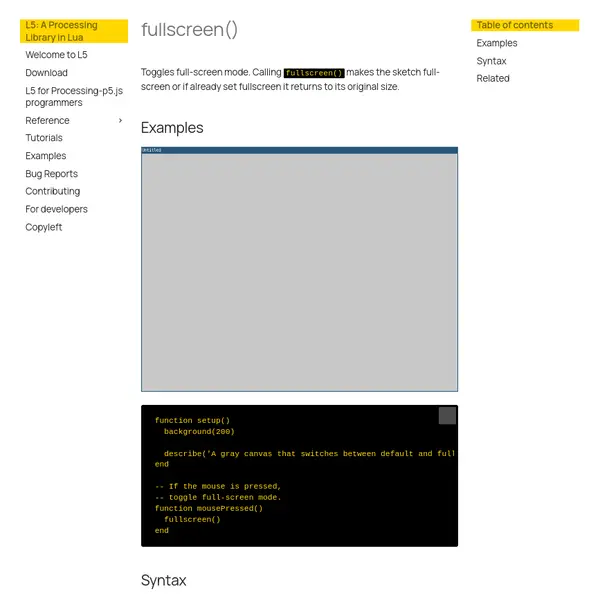
A section of L5's reference page on the function fullscreen.
The Reference was written with the beginner in mind, but may still take some effort to decipher. At the top of the page is the function name, a detailed description, then example code with screenshots or animations showing what you can expect. Finally, there is a detailed description of the exact syntax, what optional parameters are available, and links to related pages in the reference.
Where to go next
From here, check out some of the other shapes in the reference. Then try adding color, or check out more tutorials.